Showing posts with label DIY. Show all posts

Monday, May 5, 2014

Garden 2014: Fencing 101

I know, I know, absentee bloggers aren't really the right way to work a blog but I was so stressed with having to accomplish a post all of the time that I had to cut somewhere and this was first! Honestly, I figured that if I was stressing about blog posts then it just wasn't worth it, I want this to be a stress-free zone, a place for me to unload (or upload) my life, a way to detox and let some out without overburdening Hubby and freaking out the neighbors! So, no promises that I have returned indefinitely, but I am hoping to restart (again) and stick to it. 
My biggest issue is that I feel like I need a schedule, so I make one post a week, which seems too little so then it becomes three posts a week, which also seems cheap but I can't keep up with five posts a week either. So let's settle on a number here, my obsessive nature demands it. I will post twice weekly, I can manage that through the summer, while the kids are home. In the fall, I might change that, but for now, I can commit to some Momma time spent here. On to what I actually came here to chat about!


I have epic plans for a brand new garden this year. Plans that may or may not actually come to fruition, considering that we had snow not so long ago and this Northeast weather has decided to skip between winter and summer, pretty much skipping spring! We have just now got around to putting in the posts, Hubby says that we have to have all the plants in by May 15 in our zone. We shall see if that happens. We needed a pretty fair sized fence since we live surrounded by woods and we have three dogs. We found a great deal on pressure-treated posts, which, looking now, may be a bit overkill but I suppose, that it is better to be safe than sorry. 
Hubbs had a day off and our two older kids were spending a weekend with their mom, so we had relatively unhindered time to get half of the posts in. Cap fell asleep and took a nap with his grandpa while we dug so that was helpful too. 

This adorable helper had me in teary smiles with how cute he was. Not very helpful but who can say no to sunshine and smiles
Digging went a bit slower since a few of the spots had rocks the size of my hand in them. 
My brother even came out at one point to help me dig one post hole while Cap tested his leg strength
Cap desperately needed to climb into the holes that I made and then use the trowel to pull the dirt back into the hole, just in case it was an accident that it was in a pile next to the hole. 
I am so happy and grateful that I have this beautiful child to help me enjoy the sunshine

Happy Spring Everyone!!!

Monday, January 20, 2014

Teething Biscuits Trial and Error

   First, a resolution update: 
Obviously, from my lack of posts, my resolution to unplug has been relatively successful. When it came down to it, I really think that I wanted to separate myself from social media and the somewhat petty emotions and obsession that results from it. The first week of the new year I had no internet access other than updates from my Etsy store. My biggest vice was checking Facebook continuously. While I was nursing, I always felt like I had to be doing other things, up until January, that was Facebook and Pinterest. Since the New Year started, I have finished a book that I have been sitting on for two months and am halfway through another. At this rate, I will finally finish this Salvatore series that James bought for me two years ago (in my defense, there are over 20 books in this series). 
Cap' enjoying new teething biscuits

This most recent week, I have buckled and scoped out Pinterest a few times. Mostly because I can't stay away and I was looking up recipes. Hubby had a bake sale at work to help a coworker pay for a relative's funeral (his job matches all funds raised by associates for things like that) so I looked up an amazing recipe for pumpkin bars that was so successful that there weren't any left by the end of day! So on top of doing something wonderful for someone else, I found a great new recipe that already has made it onto a hard copy recipe card in my vintage recipe box. 
Last week, Hubby had jury duty all week, thankfully putting away a bad person but it meant that he also had to go to his normal job after jury duty. It made for a couple long days and at least one burnt-out mommy day where I cried and we fought. But I got some sleep and we had a talk so it's all good now. (until the next sleepless night with teething coming!)


Speaking of teething...
I haven't seen or felt actual evidence of teething, and Baby Cap' has been drooling excessively since he was two months old, so I am not sure if we have started teething officially or not. We received gel teethers as a holiday present that he doesn't really like when they are cold, but enjoys just fine at room temperature. We found out over the holidays, while making chocolate covered pretzels (that we called Sonic Screwdrivers) that Baby really likes hard pretzel rods. Not really meant for babies, he was under very careful supervision when eating them but still went through almost an entire package in the past month. We then tried Nilla wafers. Warning, do not do this until chewing is a habit. They are too soft and again, not meant for babies.

I figured that we would have to buy some teething biscuits next time we went grocery shopping but then I remembered that I know how to cook and I have Pinterest. I looked up three different recipes and Cap helped me bake and test them out. All three recipes were so easy to make and I had all the ingredients on hand. All in all, I spent about an hour (once I take out all the nursing breaks, diapers breaks and other random intrusions) mixing and baking all of them. All I did was type in "teething biscuits" into Pinterest and pick out a random three to test.
Recipe #1

The first one seemed easy, I just didn't have any baby cereal on hand and was hoping that oatmeal would suffice as a substitute. Don't do that! I would definitely cook them longer if I did it again and I would use the blender on the oatmeal to make it more of a fine powder. I found the recipe here at Ashley Thunder Events. It was an easy recipe to follow...as long as you actually follow it. I ended up not giving Cap any because they were too soft but Hubby and my younger brother both really enjoyed them!
Recipe #2

The second recipe was the one I was originally most excited about but I think that I overcooked them a bit and was heavy handed on the molasses. I am a chronic anti-measurer, it's an issue. The dough was really great and I loved that I could make them into neat shapes and finally use my dinosaur shaped cookie cutter for something. I also used a dog bone shaped cutter and then cut some of them into long rectangle shapes. Cap seemed to like them just fine, the adults in the house, notsomuch. I found this recipe here at Lil Sugar. 
Recipe #3
This third recipe ended up being my favorite so far. A couple things that I would change? I would make a double batch and a larger loaf. I would cook it longer to make them harder and I would potentially flavor it. I would also use whole wheat flour and a healthier sugar option. I didn't want to buy special ingredients in case I ended up not liking how they turned out. I found this recipe here (via Pinterest) at Spilling the Beans. This one was the winner as far as I am concerned, they ended up being the right size for Cap's little hands, they were easy and all the adults liked them as well so while all the recipes will end up in the recipe box, these are the ones that I am going to make more of this weekend with the older kids to help!


Tuesday, December 17, 2013

Handmade Holidays: Project 5: Tissue Holders

For some reason, I am sure that it was a good one, I had bought a 12 pack of tiny pocket tissue packs. I never use these tissues so I am pretty sure I meant to make felt tissues holders originally as well but I never got around to it. As previously mentioned, I have a serious goal of destashing and reorganizing my crafting life this holiday season, so I need to use what I have. I love working with felt, its great for crafting, for kids and its cheap with no fray! For the kids, and potentially for a couple adults, I made/am making some tissue holders. 
Here are a couple that I found on Pinterest, my not-so-secret love affair:


Here are the two that I have finished so far: 

For my niece, a little Monster High-esque maybe with a button closure
For my nephew, I love the tongue!
My nephews present, I have to get a photo in that tiny gingerbread man!!! Don't forget! I also added a tag in case he wanted to attach it to his bookbag

Monday, December 9, 2013

Handmade Holidays: Project 4: Soap and Candles


Another super easy project that I wanted to do this year was to make soap and candles. I do not make soap or candles completely from scratch, at least not yet, but the craft stores have easy and pretty kits that are great for beginners, or for those of us that are making them with an infant attached to the hip. I was going to try and make these with the kids, but at this point in the game, if I have the time, energy, supplies and infant cooperation, I do it. I had made soap last year to presents (and made way too many of them) so I had some left over for this year, which was good considering the 24 people that will be at dinner, plus presents for those that won't be at the meal. I also wanted to de-stash some of my crafting supplies, so I ended up using up all of my candle and soap making supplies, all I have left are some wicks which I am going to hold onto and maybe make crayon candles with the kids this winter. 
I started with herbal soaps, making oatmeal, patchouli and lavender bars for a grown up option. I still had more soap left, as well as coloring and scents that came in the kits that I had bought last year. I made super-saturated colored ones for the teens on my list, in my heart shaped silicone mold. I most definitely recommend using silicone molds for soap and candle making, they say that you can use metal pans but, in my experience, the ease of the silicone molds is incomparable. I let the soaps sit for maybe an hour, in the fridge, and they were completely set and ready for wrapping up. I just wrapped them in cling-wrap, since that is what I had in the house and we never use it for food (I couldn't even figure out why we had bought it in the first place, although I may make sugar cookies later this month and I may use it then). 
my messy workspace, aka my kitchen counter

After making all the soap, which really consists of just melting the soap in the microwave, adding color, scent and pouring it into the mold, I started on the candles. This I had never done before so it was a little bit of trial and error but I think that they turned out nicely.  I didn't use the molds for these because they were all filled with soap, instead I reused jars and glasses from spent candles. I bought white wax, no coloring and no scents. For the first bunch, I coloured them with three green crayons and scented them with the leftover bits of pine scented candles, they smell slightly but not as over-powering as the originals, which I actually ended up liking. I had enough of that to make five of the green and still have a fair amount of wax left. I crushed up dried lavendar and grabbed two purple crayons to color the wax, hoping that they purple overpowered the green, which it did. The second batch made a large candle, a tiny jar candle and three tiny jarred candles from the scents I had used in the soap. I don't know how well any of these will burn, but they look really pretty and I will probably test them out soon. I managed to do this entire project with Steven in his bouncy seat or on my hip, so it wasn't difficult at all and I really enjoyed it. The smells were amazing!

I used chopsticks to keep the wicks centered and upright

My five pine tree scented candles sitting while the lavender wax melted on the stove

this was the final result. 50 soaps and 10 candles (notice the adorable R2D2 soaps? I have a huge Star Wars fan on my list)

My little Holiday Helper! Thanks Granmichelle for the owl pillow!!

Thursday, September 5, 2013

Renaissance Faire 2013: Boy's Knight Costume

inspiration found here
     Since E's costume is all done and we are just waiting for a final fitting, I have been working on G's costume. We will probably not get to new costumes for Hubby and I this year, Steven and I have many conversations that are much more important than sewing.
     E had wanted her peacock fairy costume, G wanted a knight costume with a red "T" on it. I am assuming that he saw a picture of a Templar Knight, so that it what I used for inspiration. Since I wasn't 100% sure on his size and he isn't around to have fitting sessions with, we made the top of his costume out of old shirts of the Hubby's. A gray one was just cut down and slimmed to fit the smaller body and a white one was trimmed down a little bit with the sides left open to imitate a tunic. It should be nice and light, the weather is supposed to stay warm, while still looking like a costume.
after cutting out the shirt, I cut out 2 identical red cross shapes for the front and back, although
now thinking about it, he probably just needed one on the front. *sigh*

zig zag stitching the crosses onto the shirt in an applique style
playing with my camera effects 


wretched photo that I sent to the Hubbs to show how much I finished while Steve napped


     His pants are proving to be a bit difficult since I have lost the gray fabric that I could've sworn that I had, but if I don't find it tonight, he may just end up wearing black pants and his sneakers. I may also stitch on some armour on the sleeves of the gray shirt. As soon as he gets her on Friday we will doing a full dress rehearsal to ensure it is perfect for Saturday!!!

Tuesday, September 3, 2013

Renaissance Faire 2013: Peacock Fairy Fantasy Costume

     So after worrying for the past three weeks about what we are going to do for Renfaire costumes considering my limited amount of time, the kids not being here all the time for me to sew around them and a complete lack of idea on a nursing appropriate costume for me, I finally sat down to start sewing this weekend. The week before we are planning on leaving. Six days before I had to have them done. All five costume. One week.
some inspiration pictures were
found on Pinterest and Google
    After the mental freak out on how I was just starting the costumes now, I was able to finish almost all of E's costume, a peacock fairy, with the exception of sparkling up a pair of sandals to match. 
    We were going for a combination fairy and peacock, mostly since I already had peacock butterfly wings from Halloween clearance last year. I am trying to make a point of not needed to go out and buy anything for costumes this year, my stash is a bit unmanageable at the moment so things need to be used. For the top, since I don't particularly like putting in zippers or buttons, I just reconfigured on of her tshirts, making it into a slight peasant blouse with cap sleeves.
before, just a plain tshirt
(not the one that I actually changed,
I forgot to take before pictures)
gathering that I put in the back to
give the shirt a bit of form
front of blouse, with peasant gathered neckline, cap sleeves and flower embellishment


     The skirt was a bit easier, we were going to do a full tutu, and I am still debating just using up all of the tulle that I have to make the skirt more full. Right now, it is a simple circle skirt with three inch black waistband elastic with a tulle bustle sewn onto the back. We added some ribbon and peacock feathers for embellishment and pre-made fabric flowers that I had for embellishment. On this part, depending on what time I have left, I might make some felt peacock feathers for more oomph, but I do worry about putting so much time into costumes that they only wear once or twice. 
fabric flower embellishment on bottom of skirt
tulle bustle with peacock flowers sewn onto ribbon

     While I want them to look adorable and amaze my husband with my crafty wiles, I have to remind myself that as long as we have fun, it will not matter what they wore. The first five times I went to Renfaire, I went in civilian clothes. Once I found petticoats though, it was on. When all was said and done the costume was pretty cute, Hubby liked it, E liked it and it only took me an afternoon. It was definitely a "while the kids are napping" project (by that I mean, the infant was napping while the other children and Hubby were playing video games). It was nice to get behind the machine again, considering that I haven't done any sewing since before Steven was born. I can still see the pile of un-sewn burpclothes sitting on my dining room hutch, staring at me angrily and stressing me.  
     A full picture of the costume on will come on Saturday with a lovely family shot (hopefully) and my family outing score for the New York Renaissance Faire. 

Friday, August 30, 2013

Remodel: Blue Room Part I

I have the worlds best partner, he deals with so many shenanigans
Orange you glad I didn't say banana?
     While the Yellow room is not quite done (I am still trying to find the time to get those dang curtains done), we started painting the now Blue room. This room used to be my younger brother's and his paint choice was Irish flag inspired. Needless to say, that was not quite the idea that I wanted in the room that I would be sleeping in and I figured that we would paint it a little bit more of a fun but kind of neutral color in case my dad resells the house before repainting. We were going to go with a light gray with a slate gray accent wall, but the room is really too small for an accent wall in the way that we were thinking, it also helped that the paint (Glidden Duo, which I totally recommend, no smell, one coat and gorgeous coloring!!!) that we had used covered the obnoxious orange and green with only one coat and no primer!!! It was awesome considering that Hubby had to do most of it while I tended to Baby. The room is 11x11 so we did not want to paint it too dark (which it totally ended up being) and I hate tan or white. I was hoping that the colour was more blue tinted light grey but it ended up being purple tinted medium grey, but we will live with it for now. I am figuring that once I get our blue toned bed set in the room, it will make it seem more blue. On the other hand, it might completely enunciate the purple-ness of the grey.
     We finished the whole room in under three hours, with breaks for Baby and such. I had to go back later on that night to touch up after I pulled all the tape off but we finished much quicker then I had anticipated. Now we just have to move that furniture out so that I can put mine in and it will be just about done. The closet in that room needs handles on the doors and the cedar lining finished but it is a much fancier closet then the one in the Yellow room. 
     So with fingers crossed and the Hubbs home this weekend and the weatherman calling for rain, we should be able to finish up both rooms this weekend. Maybe a nice hike and a movie, too, any suggestions?


Wednesday, August 14, 2013

Remodel: Yellow Room Part I

view from doorway. Small, awkward windows but real sunlight!!!
Taping out the walls to do a second coat of yellow paint 
     So as we know, Hubby and I have moved into my Dad's house to help save up for a cross-country move and buying our first house together *squeee* But until that happens (transfer dependent at this point) we have been helping my Dad clean up and re-do some of his house. We have helped him, and a lovely contractor, re-do the kitchen and dining room. We have been living in a downstairs converted basement, which when I lived there in my wild and single-ish days, was huge at 16' by 30' but now with the Hubbs, Baby and the two older kids when they come over it's awkward, small and no privacy (this momma gets stressed when it's my bedtime!). That combined with my inability to maneuver stairs after the C-section, Hubby and I ended up moving a bed up to the spare room and staying upstairs for the past month. It has not been fun since all of our things are downstairs but the baby and I are relegated to the upstairs. With the multiple facets of the problem, my younger Brother (who doesn't want to be mentioned by name here) codename Twigs, and I are going to switch living spaces. He and his girlfriend are moving into the large one room basement area while Hubbs and I will be moving into the two smaller rooms. Bonuses: upstairs, windows, closets, locking doors, separate room for kids. Negatives: much smaller area, less personal privacy.
     So Hubby and I spent an afternoon, painting a second coat of yellow on the walls. The following day I repainted the inside of the closet, the top shelf and the hangar bar. They each took about three coats. I am not sure which primer my Dad had bought but it did not work as well as I had imagined. Hubbs and I bought Behr yellow and it did wonderfully.
see him here
and here, being uber sexy and gungho about this project
Closet painted, floor scrubbed
Hubby was so not happy with these pictures or being informed that indeed they would be put up on the blog. Luckily, he gets over things like that very quickly, and what he doesn't know won't hurt him. *insert evil laugh here*
     The closet is just waiting on me to repaint the shelving unit that fits in the bottom. It was an old entertainment center that my parents had painted completely black for my room when I was an angsty teen, so it obviously would not have matched the room now. I am currently in the process of the first coat of yellow after two coats of primer to cover the black. I plan on making fabric covered bins to fit in the cubbies for the two older kids clothing and shoes. There will also be a place for a hamper and toys. I haven't been able to find curtains that I like for the space, and I really want to test out the current trend of chevron print in grey to go with the yellow. I might end up buying sheets, or painting my own. Since we are condensing space, all of my crafting things need to fit on the top shelf of that closet (gahhh!!!). Considering it currently takes up a five by seven square of the basement, this single shelf will be an insane cut back in space. I will have to invent some creative ways to store fabric, machines and miscellany. Hopefully, by the end of next week the room will be done and I will be able to move on to the next room we have to freshen up. Here I come Pinterest!!!

And here are our not so helpful helpers! Marley, Juniata and Baby Steven all watching us paint. Although Steven does not enjoy just watching and he would much rather be in someone's arms helping


Tuesday, August 6, 2013

DIY: Dinosaur Crafts


intro2.jpg

     A few month ago, Home Depot had a Do-it-Herself workshop all about succulents and how to care for them. Their plant supplier gave a bunch of the plants out to the attendees so I now have two adorable succulent gardens that are still alive, thank goodness. I do not have the garden prowess that many people are blessed with so a low maintenance plant like a succulent is perfect, although we will see how well they fair come winter. Anyways, after planting these amazing little potted gardens and giving some away as presents, I still had some plants left over. I ended up giving them away but before that I perused Pinterest looking for neat ideas on how to display them. Luckily, they are very trendy and I found lots of adorable things to do with them, none of which I actually did.
     But I did find this:
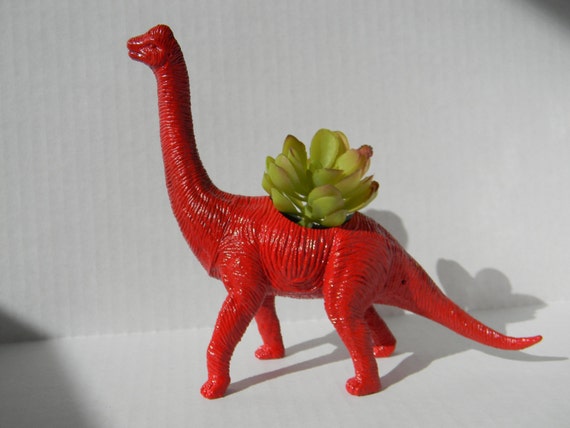
Dinosaur Planter in Red Great for Birthdays Get Well Soon and New Job Gifts
I found an entire store on Etsy that makes them *squee*
 Which led to things like these:

found via Pinterest here
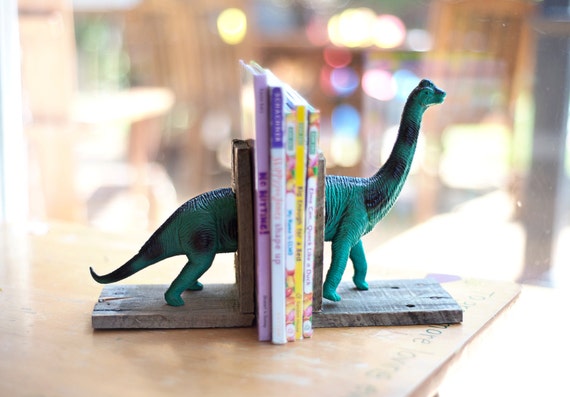
Custom Pair Reclaimed Wood Pallet Wood Dinosaur Bookends Nursery Child's Room Rustic Cottage Vintage
found on Etsy here
found here
Found here
Which are all really neat, and cute and I kind of want to decorate Baby's room in dinosaurs. He doesn't even have his own room yet but still. Then I found things like this:
     A lot less useful, but I may or may not have a slight obsession with toy dinosaur crafts and bobbles. It is on my list of things to do this summer to attempt some of these crafts. More than likely, not the dinosaur high heels. But the other ones are pretty adorable and now I have a little boy that will one day need adorable dinosaur paraphernalia.
Succulent-Gardens
find it here at Being Alison


One other blogger was at the workshop, sponsored by the Home Depot. Being Alison did live Twitter updates during the workshop and posted lots of pictures all about it and I followed her while at the store. It was a ton of fun and I definitely suggest going to one in your area. Make it a date night with some friends, Starbucks before and maybe a couple drinks after. Especially if you found a babysitter already!