Showing posts with label crafts. Show all posts

Tuesday, December 17, 2013

Handmade Holidays: Project 5: Tissue Holders

For some reason, I am sure that it was a good one, I had bought a 12 pack of tiny pocket tissue packs. I never use these tissues so I am pretty sure I meant to make felt tissues holders originally as well but I never got around to it. As previously mentioned, I have a serious goal of destashing and reorganizing my crafting life this holiday season, so I need to use what I have. I love working with felt, its great for crafting, for kids and its cheap with no fray! For the kids, and potentially for a couple adults, I made/am making some tissue holders. 
Here are a couple that I found on Pinterest, my not-so-secret love affair:


Here are the two that I have finished so far: 

For my niece, a little Monster High-esque maybe with a button closure
For my nephew, I love the tongue!
My nephews present, I have to get a photo in that tiny gingerbread man!!! Don't forget! I also added a tag in case he wanted to attach it to his bookbag

Monday, December 9, 2013

Handmade Holidays: Project 4: Soap and Candles


Another super easy project that I wanted to do this year was to make soap and candles. I do not make soap or candles completely from scratch, at least not yet, but the craft stores have easy and pretty kits that are great for beginners, or for those of us that are making them with an infant attached to the hip. I was going to try and make these with the kids, but at this point in the game, if I have the time, energy, supplies and infant cooperation, I do it. I had made soap last year to presents (and made way too many of them) so I had some left over for this year, which was good considering the 24 people that will be at dinner, plus presents for those that won't be at the meal. I also wanted to de-stash some of my crafting supplies, so I ended up using up all of my candle and soap making supplies, all I have left are some wicks which I am going to hold onto and maybe make crayon candles with the kids this winter. 
I started with herbal soaps, making oatmeal, patchouli and lavender bars for a grown up option. I still had more soap left, as well as coloring and scents that came in the kits that I had bought last year. I made super-saturated colored ones for the teens on my list, in my heart shaped silicone mold. I most definitely recommend using silicone molds for soap and candle making, they say that you can use metal pans but, in my experience, the ease of the silicone molds is incomparable. I let the soaps sit for maybe an hour, in the fridge, and they were completely set and ready for wrapping up. I just wrapped them in cling-wrap, since that is what I had in the house and we never use it for food (I couldn't even figure out why we had bought it in the first place, although I may make sugar cookies later this month and I may use it then). 
my messy workspace, aka my kitchen counter

After making all the soap, which really consists of just melting the soap in the microwave, adding color, scent and pouring it into the mold, I started on the candles. This I had never done before so it was a little bit of trial and error but I think that they turned out nicely.  I didn't use the molds for these because they were all filled with soap, instead I reused jars and glasses from spent candles. I bought white wax, no coloring and no scents. For the first bunch, I coloured them with three green crayons and scented them with the leftover bits of pine scented candles, they smell slightly but not as over-powering as the originals, which I actually ended up liking. I had enough of that to make five of the green and still have a fair amount of wax left. I crushed up dried lavendar and grabbed two purple crayons to color the wax, hoping that they purple overpowered the green, which it did. The second batch made a large candle, a tiny jar candle and three tiny jarred candles from the scents I had used in the soap. I don't know how well any of these will burn, but they look really pretty and I will probably test them out soon. I managed to do this entire project with Steven in his bouncy seat or on my hip, so it wasn't difficult at all and I really enjoyed it. The smells were amazing!

I used chopsticks to keep the wicks centered and upright

My five pine tree scented candles sitting while the lavender wax melted on the stove

this was the final result. 50 soaps and 10 candles (notice the adorable R2D2 soaps? I have a huge Star Wars fan on my list)

My little Holiday Helper! Thanks Granmichelle for the owl pillow!!

Friday, December 6, 2013

Handmade Holidays: Project 3: Birdseed Ornaments

I have been looking for a couple of presents that I can include the kids on so I have been stalking Pinterest (again!) for a couple ideas. I found one, here , but of course I decided that this was the exact project that I wanted to do and then realized that I did not have all the ingredients. So we had to improvise a little and they did not come out as beautiful as the ones in the pictures. But the kids had fun making them, although next time I will use two separate bowls and separate molds so they each can have their own space, sharing became a little bit of a problem. Maybe even invited their cousins over and make a little buffet of different kinds of seeds and mixtures that they can add. We could also collect seeds throughout next summer and fall, throw them in the freezer and use them as well.  
We ended up using raspberry gelatin which turned it red and I have since found a few other recipes that may be a little easier to use. Overall it was fun, it took about forty minutes to make but we let them dry for a whole 24 hours. We may end up making more after the holidays since we have tons of bird seed, lots of hungry birds, and cold weather activities will be in demand. It was fun and will make a cute little present for family and their feathered friends on Christmas day. 

 
bits of bird treats and one to hang on the tree in a little tin foil cookie package 

while Brother and Sister were making bird treats (and let's be honest, squirrel and deer treats) Steven ate some sweet potatoes 


Wednesday, December 4, 2013

Handmade Holidays: Project 1: Baby Quilt

My first project for Christmas ended up being a complete by chance sort of thing. I have a problem. A problem that I have heard many crafters have, and that there may be support groups for. I collect craft things, tons of craft things. Even before I was working in a craft store, I had tons of bits and bobbles. Then I worked in a fabric chain store for a year and goodness did the collection grow and spawn. It was/is a problem. Hubby gives me the "look" when he glances towards my corner/closet/room/pile of things that will become other things one day. With that look in mind, I am making in a serious focus this month to make as many presents as I can manage, thus eliminating a fair amount out of my stash and saving us money on shopping (kind of, considering I have already spent the money). 
I was in the middle of sewing super hero themed curtains for my nephew (there will be no photos because they were a ton of fabric and by the time I was done sewing, I was soooo done looking at them. Plus, they are wrapped already), and I found a pile of handkerchiefs that I had bought from evil WalMart, probably five years ago. They are the white fabric with gray owls and little stars on them. I imagine, when I bought them that I had a plan. What it was? I have no clue. But they were adorable, I have a thing for owls and considering Baby had a loosely Potter themed nursery, the print was actually kind of perfect. I had matching gray fabric left over from RenFaire costumes, yellow scraps from a box of my mother's fabric, white flannel that I had bought for burpcloths (before realizing that I never use them) and a package of crib sized batting that had been on clearance for 3.97. So I had everything except for binding. Hubby suggested an orange colour to match the little owl beaks, and I agreed.
When I made the two older children blankets last year, I just used sating ribbon folded over as binding so I figured that I would do that again for this blanket. Foolishly, I thought when I couldn't find sating ribbon, that acetate ribbon would work just as well. I was wrong. Very wrong. Don't ever do that! I washed it and it fell apart so horribly that I was very tempted to toss the entire blanket in the garbage. But I had already stitched in Steven's name and the date. So out came the seam ripper and two evenings wasted, then out to buy actual blanket binding and a night to sew that on correctly. Note to self: do it correct the first time, you cheapskate! We also went to the secondhand bookstore to pick up a copy of Harry Potter to go with the blanket for his first reading book. I can't wait to start reading my favorite series to him. I am secretly hoping that the older two kids cuddle up and listen too. So, after using four or five yards of fabric that I had laying about and a slightly stressful binding experience, Steven's first Momma-made blanket is all finished, folded and waiting to be wrapped. 


Piecing together the squares
Finished top
Hand stitched little message for Steven's first baby quilt. Hopefully, we will have many, many nights snuggled underneath, reading together


I also finished a handful of burpcloths, mostly I just use these when feeding Steven to wipe his face and hands. The fabric was a flannel flat sheet from the thrift store for $2 and it made 9 burpcloths. 

Tuesday, August 6, 2013

DIY: Dinosaur Crafts


intro2.jpg

     A few month ago, Home Depot had a Do-it-Herself workshop all about succulents and how to care for them. Their plant supplier gave a bunch of the plants out to the attendees so I now have two adorable succulent gardens that are still alive, thank goodness. I do not have the garden prowess that many people are blessed with so a low maintenance plant like a succulent is perfect, although we will see how well they fair come winter. Anyways, after planting these amazing little potted gardens and giving some away as presents, I still had some plants left over. I ended up giving them away but before that I perused Pinterest looking for neat ideas on how to display them. Luckily, they are very trendy and I found lots of adorable things to do with them, none of which I actually did.
     But I did find this:
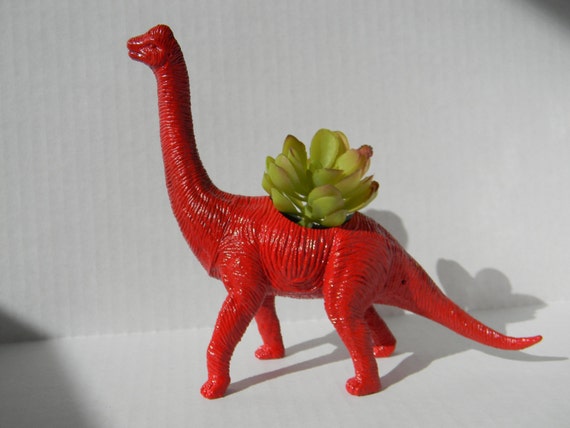
Dinosaur Planter in Red Great for Birthdays Get Well Soon and New Job Gifts
I found an entire store on Etsy that makes them *squee*
 Which led to things like these:

found via Pinterest here
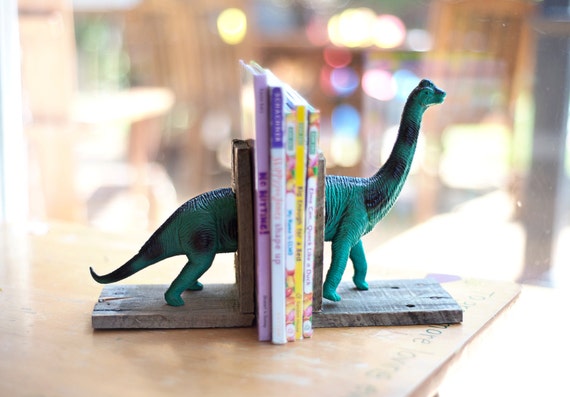
Custom Pair Reclaimed Wood Pallet Wood Dinosaur Bookends Nursery Child's Room Rustic Cottage Vintage
found on Etsy here
found here
Found here
Which are all really neat, and cute and I kind of want to decorate Baby's room in dinosaurs. He doesn't even have his own room yet but still. Then I found things like this:
     A lot less useful, but I may or may not have a slight obsession with toy dinosaur crafts and bobbles. It is on my list of things to do this summer to attempt some of these crafts. More than likely, not the dinosaur high heels. But the other ones are pretty adorable and now I have a little boy that will one day need adorable dinosaur paraphernalia.
Succulent-Gardens
find it here at Being Alison


One other blogger was at the workshop, sponsored by the Home Depot. Being Alison did live Twitter updates during the workshop and posted lots of pictures all about it and I followed her while at the store. It was a ton of fun and I definitely suggest going to one in your area. Make it a date night with some friends, Starbucks before and maybe a couple drinks after. Especially if you found a babysitter already!